What is Omni-Channel in Salesforce?
Omni-Channel is a powerful feature in Salesforce that allows businesses to provide seamless and unified customer service across various channels, such as phone, email, live chat, social media, and more. It enables service agents to receive and manage customer inquiries from multiple sources in a single, easy-to-use interface.
By implementing Omni-Channel, companies can ensure that agents can provide a consistent and timely response no matter where a customer reaches out—whether it’s via live chat, email, or social media. This improves customer satisfaction, reduces response time, and increases overall efficiency.
To learn more about improving agent efficiency, check out How to Set Up Service Cloud in Salesforce.
Benefits of Omni-Channel:
- Unified Agent Interface: Agents can handle all customer inquiries from a single screen, making it easier to manage different channels.
- Increased Productivity: Omni-Channel routes work in a way that ensures the right agent handles the right customer interaction, allowing agents to focus on their strengths and respond faster.
- Better Customer Experience: Customers don’t need to repeat their issues across multiple channels, and their requests are handled in a timely and efficient manner.
- Real-Time Reporting and Insights: Omni-Channel provides valuable insights and analytics, helping businesses monitor service levels and improve workflows.
How to Implement Omni-Channel Routing Step by Step
Implementing Omni-Channel routing in Salesforce involves configuring both the channels and routing strategies. Below is a step-by-step guide on how to set up Omni-Channel routing in Salesforce.
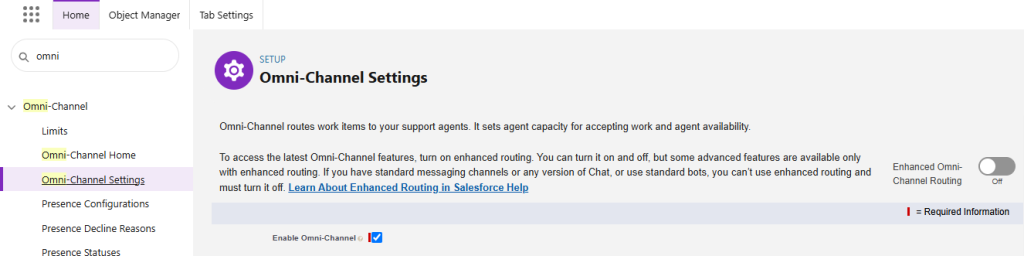
Step 1: Enable Omni-Channel
To start using Omni-Channel, you first need to enable it in Salesforce.
- Navigate to Setup:
- Go to Setup in Salesforce.
- In the Quick Find box, type Omni-Channel Settings.
- Enable Omni-Channel:
- Click on Omni-Channel Settings.
- Click Edit, and check the box to enable Omni-Channel.
- Save the settings.
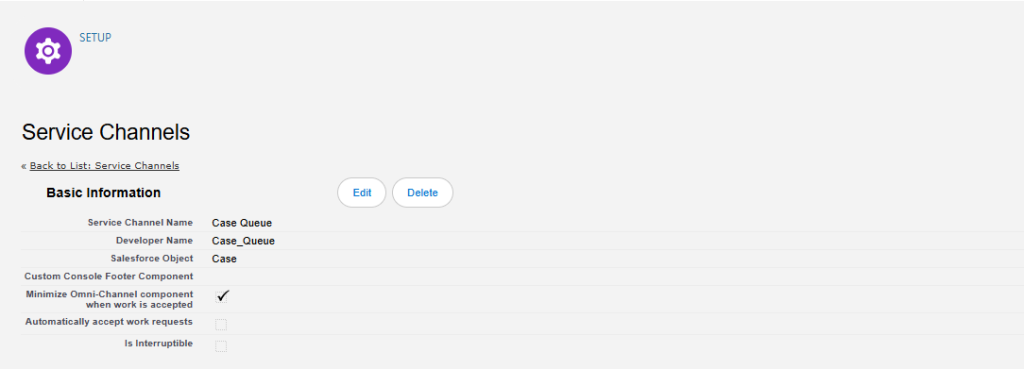
Step 2: Set Up Service Channels
Omni-Channel works with various service channels, including Chat, Email, and others. Here’s how you can configure them:
Step 3: Set Up Presence Status
Presence statuses determine agents’ availability for receiving work items. Agents can toggle between statuses, such as “Available” or “Away.”
- Go to Setup:
- In the Quick Find box, search for Presence Statuses.
- Create a New Presence Status:
- Click New.
- Enter a Status Name (e.g., “Available for Cases” or “Available for Chats”).
- Optionally, enter a Status Label for the user interface.
- Select Channels: Choose which Omni-Channel objects (e.g., Cases, Chats, Leads) this status will support.
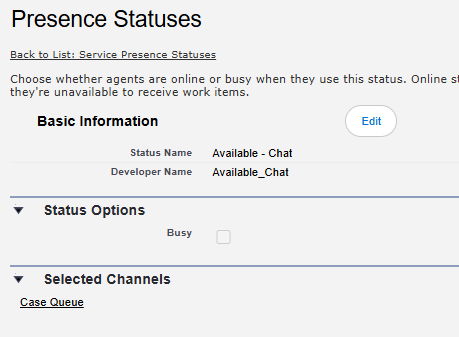
- Set Up Permissions:
- Assign the presence status to specific profiles or permission sets to ensure only authorized agents can use it.
- Save the Presence Status.

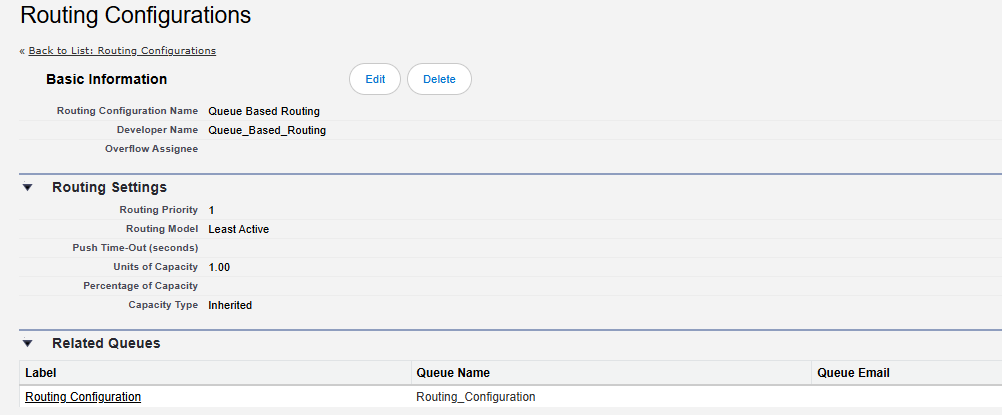
Step 4: Configure Routing Configuration
Routing configurations define how work items are assigned to agents and control the logic behind workload distribution. The Routing Configuration is a key part of Omni-Channel that defines how work items (e.g., Cases, Leads, Chats) are distributed to agents. Below are the main components of a Routing Configuration and what each of them does:
- Go to Setup:
- Search for Routing Configurations.
- Create a New Routing Configuration:
- Click New and fill out the details:
- Routing Configuration Name: Enter a meaningful name (e.g., “High Priority Case Routing”).
- Routing Priority: Choose between:
- Most Available Agent: Routes work to the agent with the least workload.
- Least Active Agent: Routes work to the agent who has handled the fewest items.
- Units of Capacity: Assign capacity for the work item (e.g., 1 for chat, 2 for complex cases).
- Click New and fill out the details:
- Assign Work Item Timeout Settings (optional):
- Define what happens when a work item is not accepted within a specific timeframe.
- Save the Routing Configuration.
For more guidance on queue management, check out Queue Setup and Best Practices in Salesforce.
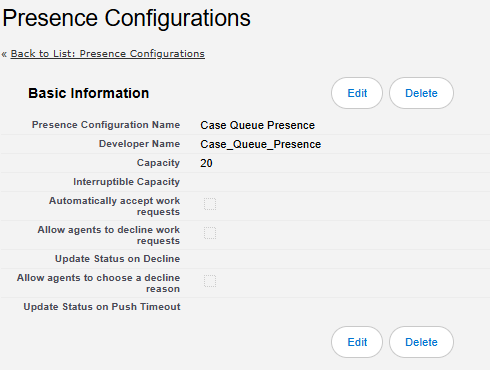
Step 5: Set Up Presence Configuration
Presence configurations connect presence statuses with agents and define their Omni-Channel capacity.
- Go to Setup:
- Search for Presence Configurations.
- Create a New Presence Configuration:
- Click New and enter the following details:
- Name: Enter a name for the presence configuration (e.g., “Chat and Email Configuration”).
- Capacity: Define the maximum number of units an agent can handle simultaneously. For example:
- Chat: 1 unit per interaction.
- Email: 2 units per case.
- Routing Priority: If applicable, set how items in this configuration are prioritized.
- Click New and enter the following details:
- Assign Presence Statuses:
- Add the relevant presence statuses that agents will use (e.g., “Available for Chats”).
- Assign Agents:
- Assign this configuration to specific profiles or users.
- Save the Configuration.
Step 6: Configure Presence Decline Reasons (Optional)
Presence decline reasons allow agents to specify why they are declining a work item. This feature is optional but can provide valuable insights into operational bottlenecks.
- Go to Setup:
- Search for Decline Reasons under Omni-Channel.
- Create a New Decline Reason:
- Click New.
- Enter the Decline Reason Label (e.g., “Overloaded”, “Out of Scope”).
- Add a Reason Description to provide more clarity.
- Enable Decline Reasons:
- Go to Omni-Channel Settings in Setup.
- Check the box for Enable Decline Reasons and save.
- Assign Decline Reasons to Profiles:
- Define which users or profiles can see and use these decline reasons.
- Save the Decline Reason.
Conclusion
Salesforce Omni-Channel is an excellent way to streamline workload distribution and enhance customer service. By setting up queues, routing configurations, presence statuses, and monitoring tools, organizations can efficiently route work items to the right agents at the right time. Implement these steps today to elevate your Salesforce service experience!
Let us know in the comments if you have any questions or need further guidance on Omni-Channel configurations!